Logorama from Marc Altshuler - Human Music on Vimeo.
3D Computer Imaging and 3D Animation are offered at the University of Oregon through the Digital Arts program in the Art Department. The class uses Blender 3D, an opensource 3D package.
Friday, June 4, 2010
Monday, May 17, 2010
Wednesday, April 28, 2010
Keyed Particles are the Answer
For those of us who were trying to figure out how to duplicate this build effect:
This looks like the answer (along with some crafty work-arounds, of course):
I know little about keyed particles but there is ample documentation online. Just another arrow in our quivers, or whatever.
I AM from TronicStudio on Vimeo.
This looks like the answer (along with some crafty work-arounds, of course):
Blender Keyed Particles - Render from Everton Schneider on Vimeo.
I know little about keyed particles but there is ample documentation online. Just another arrow in our quivers, or whatever.
Friday, April 23, 2010
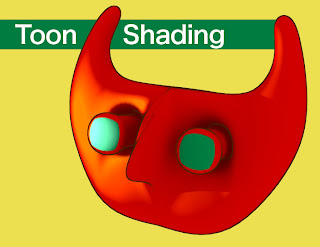
Toon Shading
 Though we haven't gone over this in class, Blender does have a TOON SHADER which will allow you to get closer to a cell shaded look in your renders. There are many resources on the web, but I wanted to show you a sample image and example .blend file.
The file can be downloaded here: http://uoregon.edu/~park/472/Models/toon.blend
Note: toon shader options are availabe under the Shaders tab in the Shader Panel. Ambient occlusion IS on in this file. Edges are on (black contour lines), an option that can be found under the Edges button i the Scene Panel (where you change render settings).
Wednesday, April 21, 2010
3D Game Engine Options
Blender has an inline 3D game engine. To get started, check out this link:
http://wiki.blender.org/index.php/Doc:Tutorials/Game_Engine/BSoD/Basics_of_the_GE
Unity 3D Game Engine (Free version, pro version, exporters to iPhone and Wii for $$$):
http://unity3d.com/unity/
http://wiki.blender.org/index.php/Doc:Tutorials/Game_Engine/BSoD/Basics_of_the_GE
Unity 3D Game Engine (Free version, pro version, exporters to iPhone and Wii for $$$):
http://unity3d.com/unity/
Iris Texture Resource
This is a link to the original Blender Nation article, make note of the portion where the owner of these photographs requests an email before use. Please do so, I've used Jon's iris photos before and he only cares to know about the project and to get a link to it's completion. Follow the link on the BN page to the textures, enjoy!
http://www.blendernation.com/free-iris-textures/
http://www.blendernation.com/free-iris-textures/
Monday, April 19, 2010
Linked Libraries (better than appending for group projects)
Here is the process of linking libraries/groups/armatures to one another in Blender. In many ways this is superior to APPENDING because it preserves weight painting and armatures. On the flipside, this process is more tedious and requires some setup:
I prefer the following method:
1) In master file, set the PATHS in User Preferences to 'relative'
2) group everything you want in the master file by selecting them in object mode and hitting CTRL+G (select Add to New Group). You can rename the group in the Objects Panel (F7).
3) In the New Blender file that you want to link stuff into, go to File>Append/Link. Toggle the LINK button (as opposed to the APPEND button) and then click into the master .blend file. Go into the 'Groups' directory and choose your group.
4) Though it appears that nothing has happened, something has been added to your scene. In object mode hit the space bar and choose ADD>GROUP>your group name
5) Now you see a linked uneditable replica of the master group.
6) To allow for editability select the group and hit CTRL+ALT+P to make a proxy (similar to an Instance in Flash).
A slightly different method can be read about here:
Read More HERE: http://wiki.blender.org/index.php/Doc:Manual/Data_System/Linked_Libraries
Subscribe to:
Posts (Atom)


